
The MXL 2001 / V67G Capsule Swap Mod
Sunday, July 5th, 2015 | by matthew mcglynn
It is not news to anyone reading this that there is a ton of decent, affordable pro audio gear on the market.
And it is probably not news that a lot of that gear can be made better through DIY — Do It Yourself — modification.
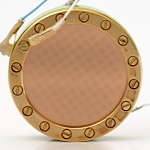
In this article, we’ll take a look at a simple and very effective modification for one of the most popular microphones on the market: the 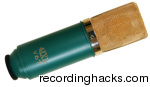 MXL V67G.
MXL V67G Baseline Test
I spent an afternoon in the test lab* with a couple of these microphones. I tested two to make sure I was starting with a microphone that offers performance representative of the product:
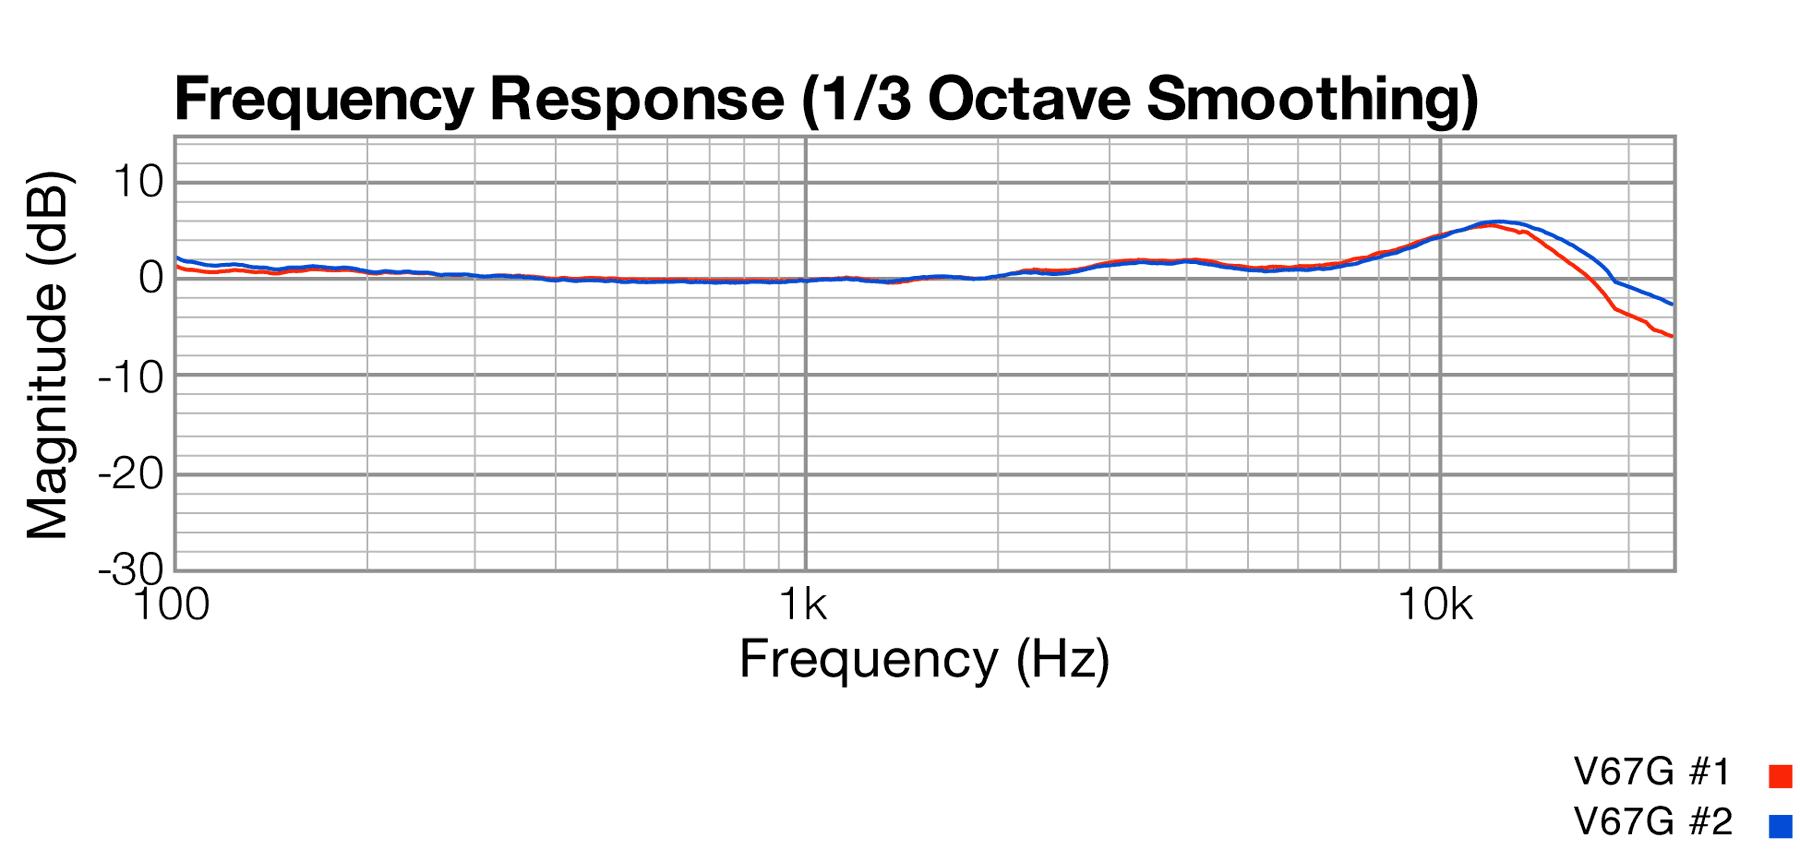
The two microphones have a frequency response that is nearly identical up to about 12kHz. Above 15kHz, one of the two mics is 1–2dB brighter. I suspect this is due to variances in the capsules, because making capsules sound exactly the same is difficult and expensive.
What the graph shows is a fairly high-amplitude (+6dB) peak around 12kHz. This mic is likely to sound bright on most sources. I think it would work well on drum overheads and large-body acoustic guitars, but might get fatiguing if used on multiple tracks in a mix.
Sibling Mics Share This Circuit and Capsule
By the way, the V67G is essentially the same microphone as a couple of other popular models you might know. All of these mics use the same circuit, more or less, and the same capsule, more or less:
 MXL 2001 |
 ADK A-51 |
 MXL 3000 |
 t.bone SC-450 |
The circuit is a 2-stage transistor design, with the first stage being cribbed pretty closely from the U87, including the “negative feedback” piece that provides corrective high-frequency de-emphasis to prevent the capsule from sounding too peaky or bright. The second stage is an “emitter follower,” which feeds a relatively low-impedance signal into a low-ratio output transformer.
Here are a few of the differences among these mics: the MXL 3000 has a few upgrades as compared to the others, including a large film capacitor feeding the transformer, and a direct-coupled front end to avoid the need for an input cap. The A51 has ~3dB higher output, which suggests circuit changes that are not obvious to casual inspection. The SC-450 has switchable pad and HPF options.
There are very likely additional differences between these mics in component values and quality, of course — I didn’t attempt to compare them at the component level. But I’m confident that all these use substantially the same circuit design, and similar capsules.
To prove the point, here’s a graph* of the V67G, A51, and 3000:
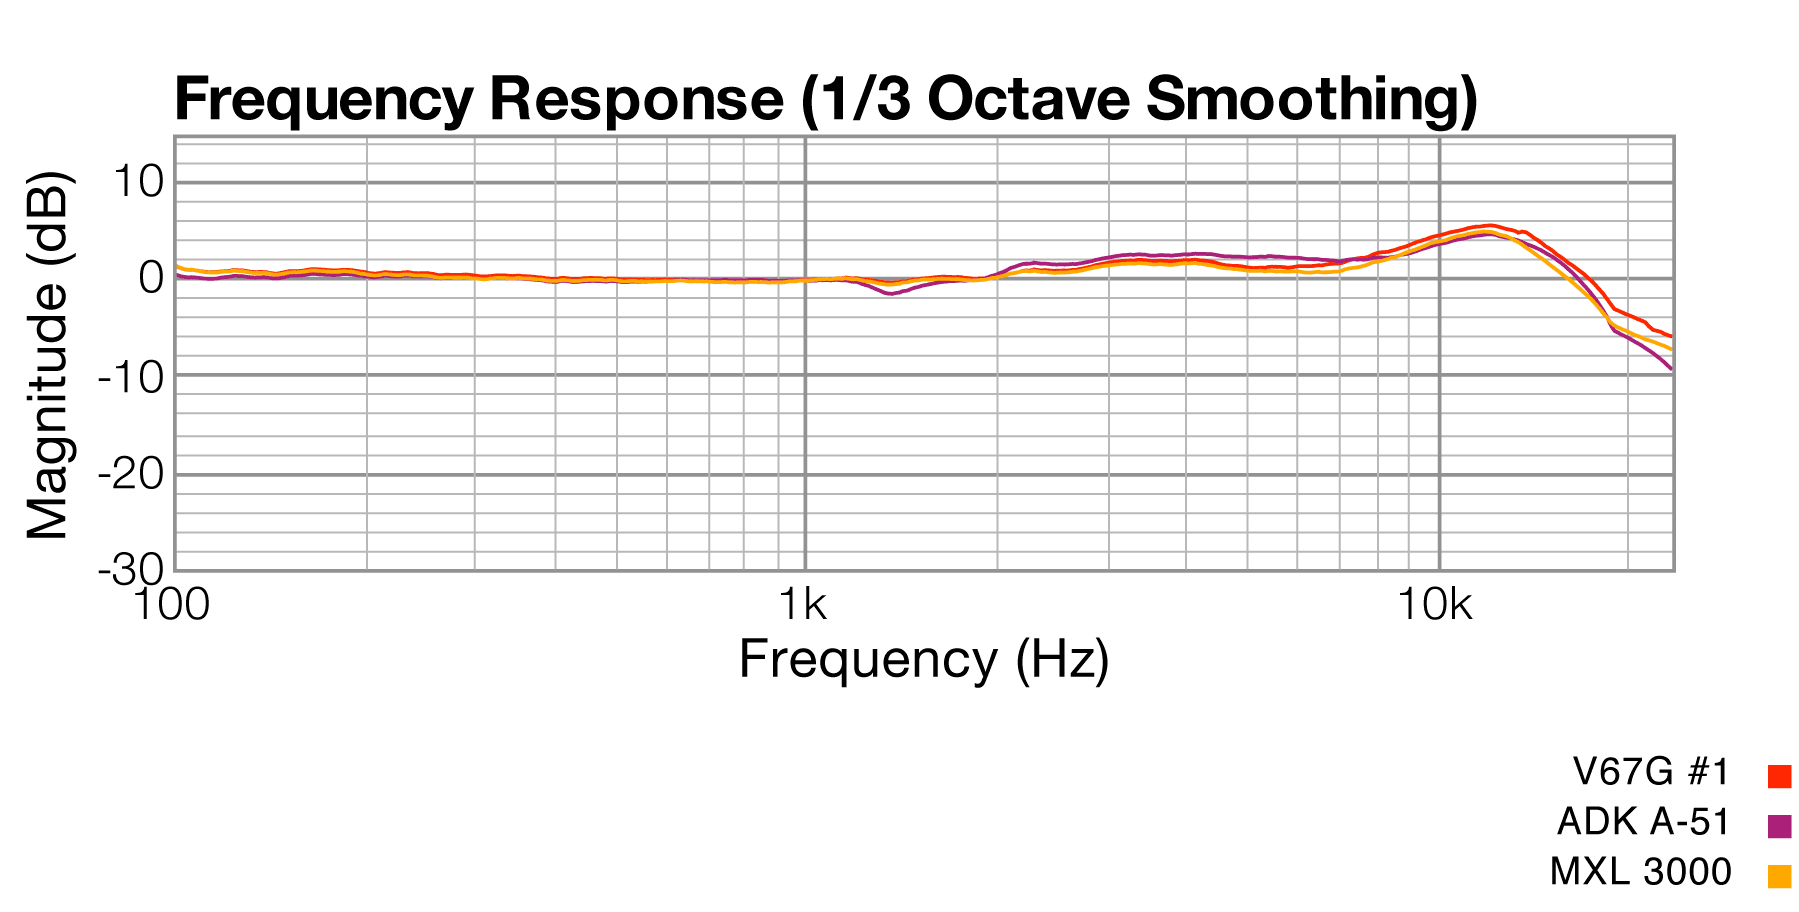
As expected, they’re nearly the same — well within the variances I’d expect from individual capsules.
About Negative Feedback
(This section is provided for the mic nerds in the audience; feel free to skip ahead to the good stuff.)
The feedback mechanism in the U87 has the effect of reducing high frequencies, creating roughly 5dB of attenuation @ 10kHz, and 10dB of attenuation @ 20kHz. The 2001/V67G circuit doesn’t come close to the same level of attenuation, though. I say that because my acoustic tests don’t show a very U87-ish response — at least, not with the stock capsule.
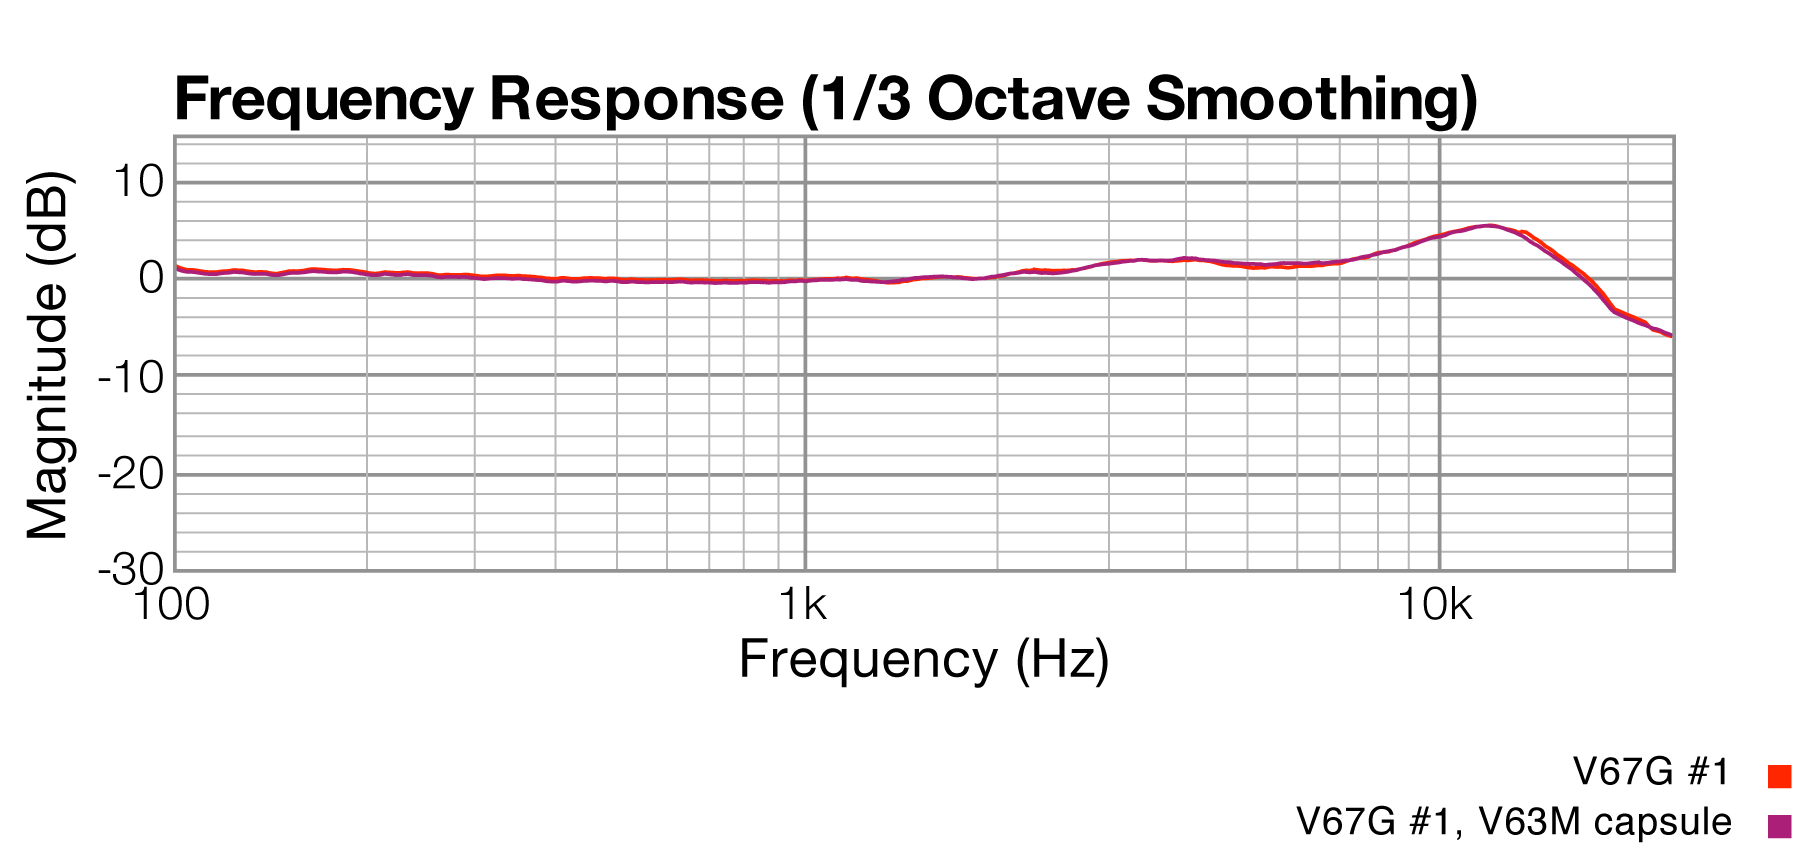
Which leads me to my next test. The MXL V63M and the older MXL V57 are both transformerless microphones with “linear” circuits — meaning, the circuits don’t do any attenuation. Here’s a comparison* of the more conservatively voiced of my two V67G’s, compared to a V57 and V63M. All three microphones have 32mm K67-style capsules that are visually identical.
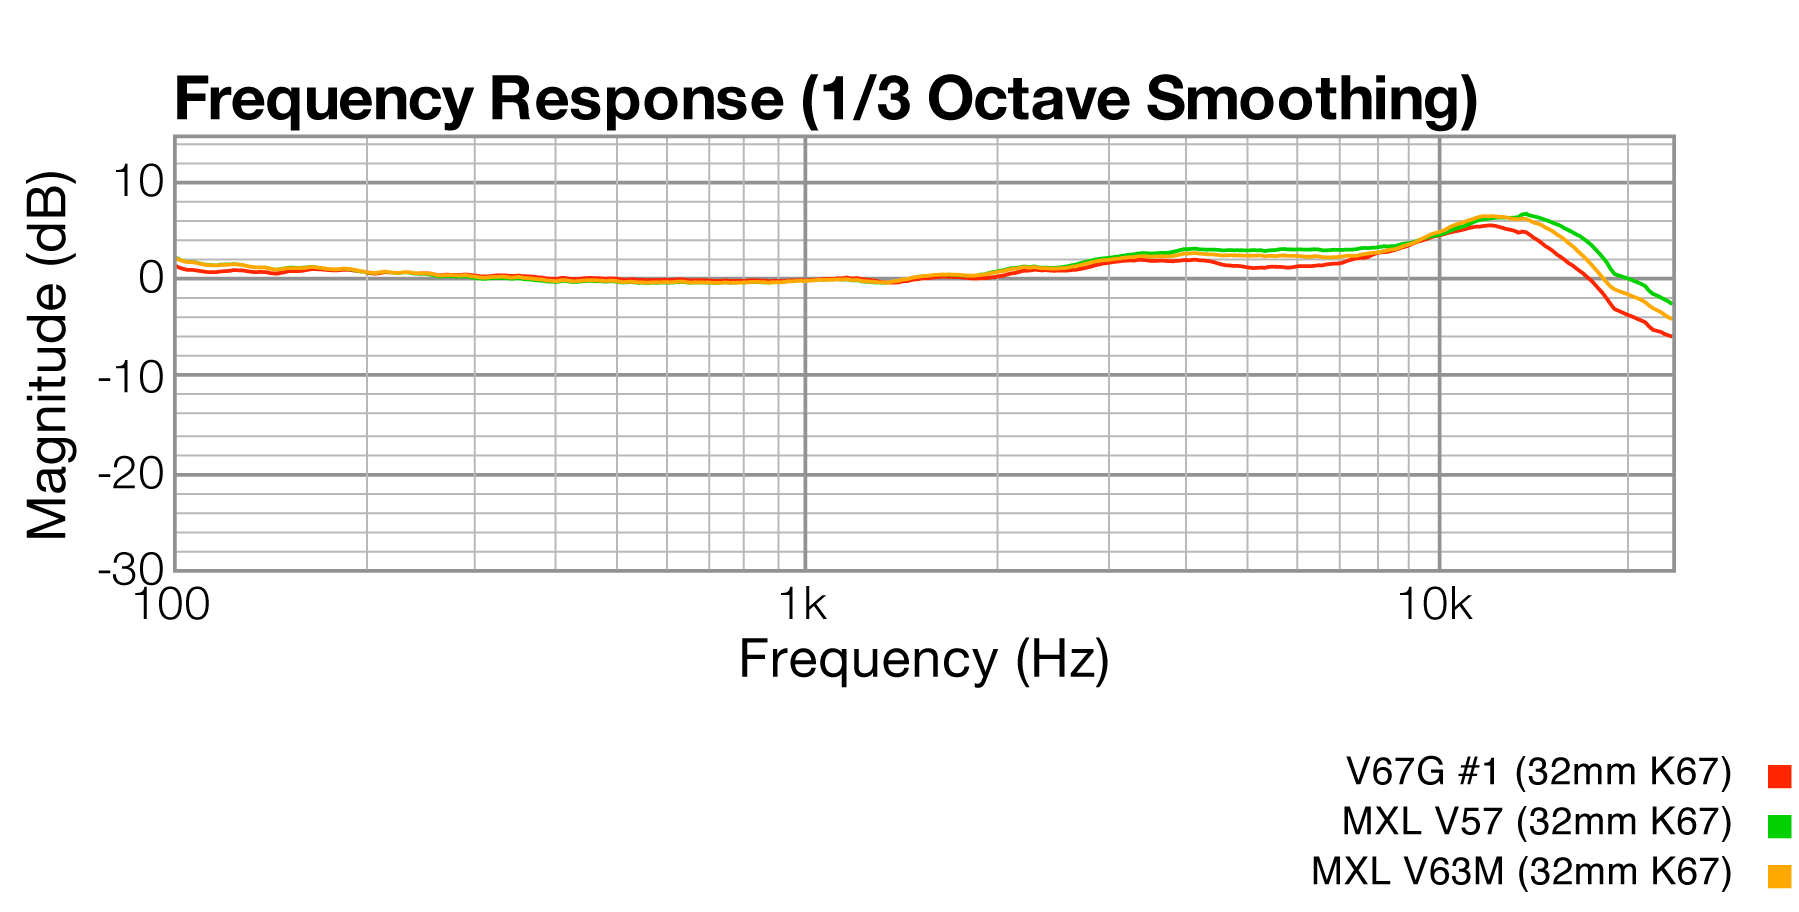
The V67G is 1–2dB leaner in the 4–8kHz range, and 2–4dB darker above about 15kHz. That’s a welcome improvement, to my ear; I find those transformerless/linear LDCs just too bright for most sources.
To make sure that what I’m seeing here is due to the circuit, rather than the capsule, I transplanted the V63M capsule into the V67G and retested. First, here’s the V67G with stock capsule vs. V67G with the borrowed V63M capsule:
They’re all but identical, which suggests that these two microphones do use exactly the same capsule design.
Now we can compare the V63M to the V67G, using the same capsule in both mics:
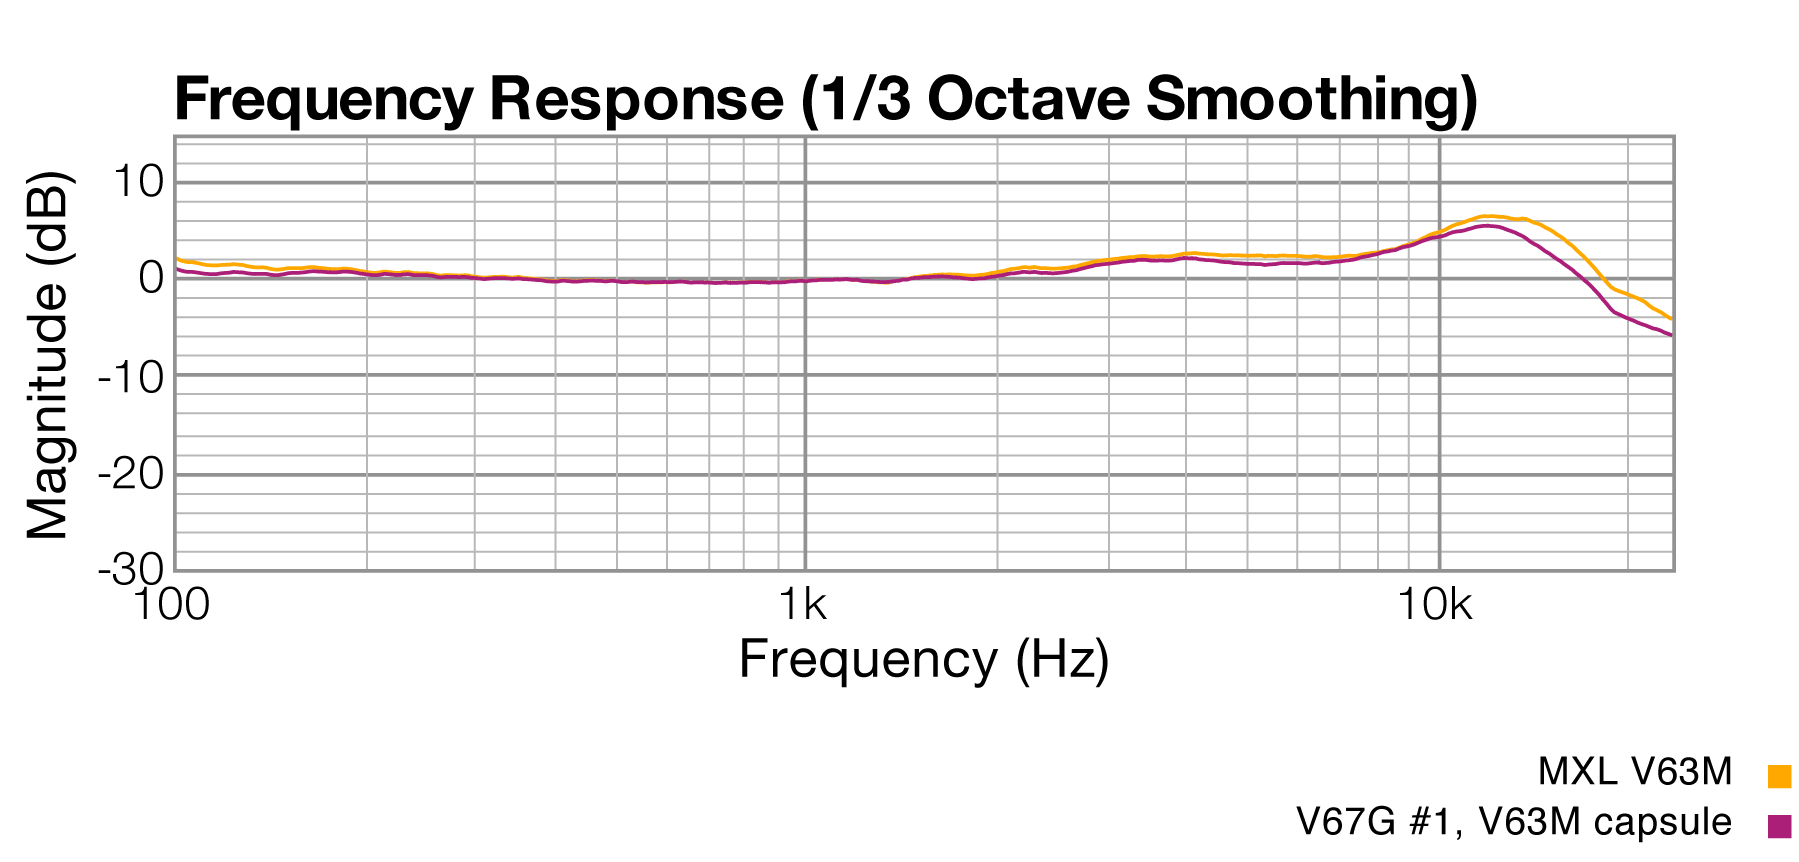
This, at last, shows the acoustic effect of the circuit differences (and headbasket/grille differences) between these two microphones: approximately 1dB attenuation in the upper mids (4–7kHz), and 1–2dB attenuation above about 12kHz.
What’s interesting about that is that this circuit should be cutting the high frequencies much more aggressively. Why is doesn’t is a matter for a follow-up blog post. For now, let’s get back to the point of this one: simple but very effective mods.
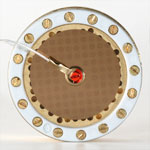
Capsule Replacement Therapy
In a nutshell, the simplest and most effective microphone mod is to change the capsule. The capsule is the component that has the most significant impact on the sound captured by the mic. The way the capsule converts acoustic energy into electrical energy almost completely determines what you’ll hear on playback.
Sure, the circuit might boost or cut selected bands of frequencies. But unless you have a sufficiently advanced understanding of the circuit to implement EQ changes there, the far easier mod is to change the capsule to something that works in harmony with the existing circuit.
To that end, I swapped three different aftermarket capsules into this V67G, and ran acoustic tests to compare them.
Full disclosure: I have a material interest in the company that manufactures these capsules, microphone-parts.com. Read more about these capsules, and numerous competing models, in the RecordingHacks Large-Diaphragm Capsule directory.
Here is a comparison sweep of the V67G with a variety of different-sounding capsules*:
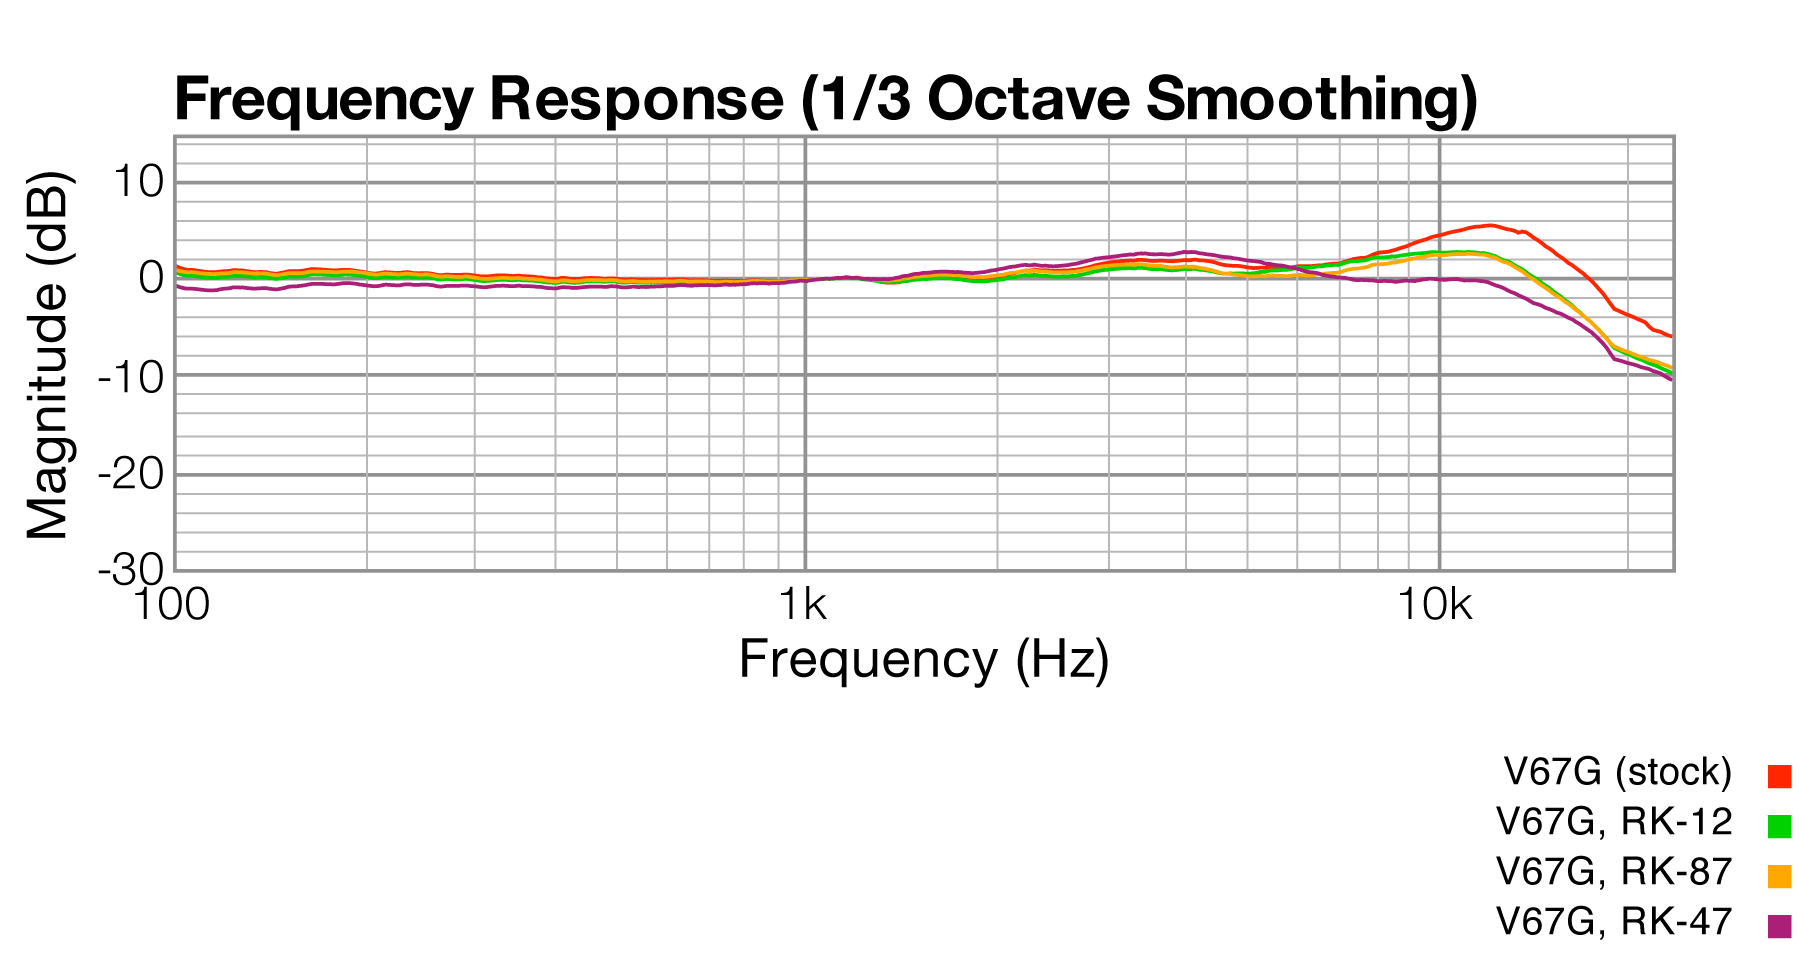
The red trace shows the stock microphone, with its somewhat unwelcome and exaggerated 12kHz peak.
RK-47
 The purple trace shows the V67G with an RK-47 capsule. This is a K47 replica, made in the old style with brass clamping rings. It provides slightly forward mids, with a neutral top end.
This capsule’s top end starts to roll off right around where the V67G circuit’s attenuation starts to kick in; the combination gives this mod an almost ribbon-like top end.
This mod would be great for taming jangly guitars and cymbal-bashing drummers. It would probably sound really good on guitar cab. It might be too dark on some sources. But there’s no question that it sounds different than stock — which is critical for building variety into your mic locker (and for reducing agony in your mixes). For example, the RK-47 has 6dB less output at 12kHz than the stock microphone!
RK-12
 The green trace shows the V67G with an RK-12 capsule. This is a CK12-style capsule, edge-terminated like its namesake. It has an intentionally bright response, but the high-frequency peak is broader and smoother than a typical K67 type. You can see this in the graph: the RK-12 has higher output in the 5–10kHz range, relative to the peak, than any other model.
This mod makes a fantastic all-purpose mic, from vocals to guitar to percussion. The response is smoother and more neutral than the stock mic. This capsule provides nearly 1.5dB higher sensitivity than the stock mic, too.
RK-87
 The yellow trace shows the V67G with an RK-87 capsule. Although superficially similar to the RK-12, the RK-87 is a bit fuller in the 2–4kHz range, and leaner from 5–10kHz. It sounds different, too, because it is center-terminated (like the original K67/K87) rather than edge-terminated.
This mod, to my ear, is a strong contender for an all-purpose studio microphone; it has a nicely balanced sound overall, with nice articulation and detail, and no hype on the high end. It has 3dB higher output than the stock microphone, which means the modded mic’s noise floor will be audibly lower than before.
Conclusion
To be sure, there’s nothing objectively wrong with any of the microphones listed in this article. They’ve all sold a ton of units, and been used on tens of thousands of recordings.
These microphones have a fairly bright response, which makes them great for some sources and not so great for other sources. It’s up to you as the engineer to determine whether a microphone (or any piece of gear) is capturing the sound you want to hear.
If you own one of these microphones and find that it is too bright or peaky for your tastes, know that there are a variety of aftermarket capsules that will “re-voice” the mic, giving it — as demonstrated above — a smoother response with less-exaggerated peaks. The result is that your recorded tracks will need less EQ, and will stack better in a mix.
To my ear, all three of these RK-series capsule choices result in viable mods; each provides an audible reduction in the mic’s 12kHz response, and a smoother response overall. Each provides a different frequency curve, which means it is possible to create a couple different-sounding microphones just by swapping different capsules into this one donor platform.
*About these graphs: my room is treated, but not anechoic. The rig has been calibrated with a $950 measurement mic, and I use “time windowing” to reduce the effect of room reflections. But these results still won’t look exactly like what you’d get from a professional test chamber. Nonetheless, they’re useful for comparing multiple mics tested under identical conditions, especially considering that we’re only looking at 1kHz and above.
Related posts:


Posted in DIY, Microphones | 13 Comments »
Michael Bowler
July 6th, 2015 at 6:34 am
Thanks Matt. This was an eye-opening read for me. I especially liked your tests of the original MXL capsules which highlighted manufacturing variances, and the graphs showing how your replacement capsules responded. I don’t have a C12 or K87 type mic, so I could see myself creating one with one of these mods. I’d probably pick the 2001 just because I think it looks less ridiculous than the V67 🙂
David
July 7th, 2015 at 4:59 am
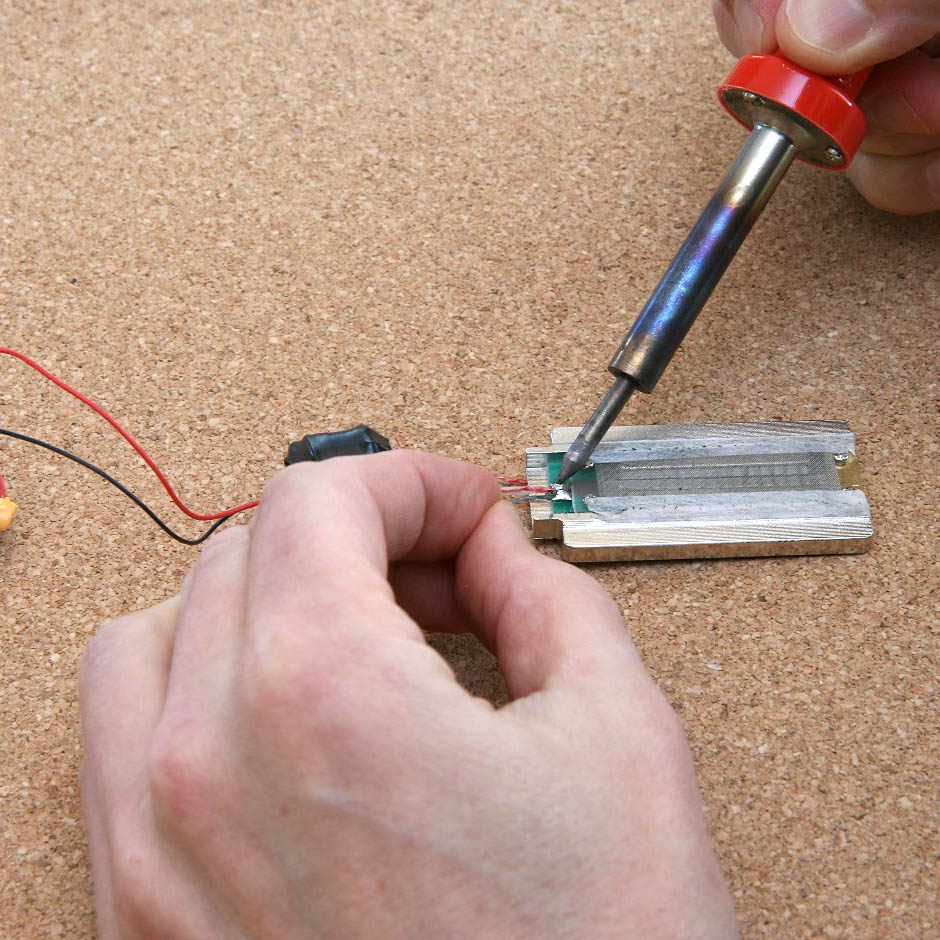
Do you think you could do some photos of what it takes to swap out the capsules?
matthew mcglynn
July 7th, 2015 at 8:52 am
@David, you can see instructions here:
http://microphone-parts.com/pages/rk12-capsule-installation-instructions
Replacing capsules requires soldering. If you’ve never soldered before, I do not recommend learning how by putting a $100+ capsule at risk.
Or, I can help coordinate having your mic serviced, via technicians in Nashville, Texas, and Los Angeles.
Mark
July 16th, 2015 at 9:48 pm
I’l love to see a accompanying article about EQ circuit mods like the SP C1/C3 mod and MXL 603 mod with comparisons with “factory modded” mics. I just ordered the former and plan on order the later very soon.
VoiceOver Talent
September 18th, 2015 at 4:40 am
Hello everyone. In the recent past, I changed the capsule of my V67 and SC 450 for two capsules that someone brought me from Russia. Interestingly one said MADE IN RUSSIA and the other said made in Germany (one will be a copy of another). Were identical in shape and size … just the color was different. Over the sound of the microphones, not only these but the rest … through the time I realized that the preamp makes all the difference. In my Focusrite Scartlet 6i6 the Neumann U87 has a stuffy and nothing brilliant sound. When I connect it to my Tascam US200, the sound improved 5 times. When I use it in my Universal Audio 710 (Made in the USA) the sound has improved 20 times. The same happened with the Pre Amplifier Sontronics Sonora (Made in the UK)
These same feelings also happen with cheap microphones. My old T-Bone SC450 connected to UA710 had a bright sound, despite the sharp means annoying that I had to fix via software. In The SC450 i put the Made in Russia capsule, and the capsule made in Germany in the mxl v67.
The sound was radically different in both micros. The SC450 got a fuller sound, while the V67 has not changed significantly … just the frequency bass a little higher.
Earlier this year in one of my trips to Italy, I met a German who had moved to that country, and had a different technique … also used by specialists.Change the GRID. Someone in Italy manufacture different grids to the microphones and apply them, refusing to move mostly in capsules or circuits. For him the most important for the microphone is the self noise. I confess that for me as VoiceOver talent i share the same opinion. This German was in love with Portuguese wines and Travel . We made there a friendship and I try some microphones in the studio where it worked. Experienced an MXL 2006, Cad100s a Oktava 219 (mod by Michael Joly) an MXL VO1, and an Audio Technica 4040.
The MXL 2006 and the VO1 had a grid with thhiker holes and with a mixture of acrylic. Cad 100 was unchanged, the Audio Technica 4040 had a golden finer grid .
I am familiar with the sound of my voice to the models of mxl and audio technica, as well as oktava. I’ve never tested the CAD before in my life.
Personally I think and always found the sound mxl 2006 and VO1 identical … and even with this change, the mids attendance has improved and opened sound. the Oktava had a fantastic sound and almost no self noise (I was delighted) Audio Technica had an improved sound level of low frequencies … less p p p beats . The Cad was my first experience and the sound in my voice seem to be between the sound of RODE nt1a and NT2A. Conclusion, in some cases it is not necessary to change capsules …But who knows…or get a better mic or make some mods. Best
Keith
October 7th, 2015 at 2:52 pm
Great article. I did the circuit mod and replaced the cap in an MXL 990 (and new headbasket). All through microphone-parts. Great stuff. I’m no pro but the mic sounds more clear and natural to my ear. Less shrill. Also, louder? Either way, I feel it is more usable now than ever. I’ve got more 990s and and an MXL V67G that I’m sure I’ll end up modding as well.
matthew mcglynn
October 7th, 2015 at 2:57 pm
@Keith, the 990 circuit mod will absolutely raise the output level, and lower the self-noise too. Sensitivity jumps from ~15mV/Pa (stock) to ~35mV/Pa (modded).
Regarding the V67, there is a new transformer circuit for that mic that is pretty great:
http://microphone-parts.com/products/t-84-circuit-kit
(Full disclosure: I designed that circuit kit, based on Neumann’s KM84.)
Angelo
December 6th, 2015 at 3:18 pm
Nice! I’ve been looking into modding my (overly bright) NT-1 for a while now…
I do wonder, these charts make it seem like frequency response is the be-all end-all difference between mics. But if that were true, we could just slap an eq on a 57 and be done with it 😉
What else have you found changed, when inserting a new capsule?
matthew mcglynn
December 6th, 2015 at 3:43 pm
@Angelo, I agree that these graphs do not represent a comprehensive description of a mic’s sound, but they’re extraordinarily useful here because the specific characteristic we’re investigating is the high-frequency peak that is common to inexpensive Chinese-made LDCs.
In the case of the NT1 and NT1A, the circuit is actually very good. Many people would argue that the single characteristic of those mics that prevents it from being usable on many sources is the frequency response. In a nutshell, it’s too bright — as you say. The easy fix there is to change the capsule to one that is less bright. Alternatively, you could build high-frequency attenuation into the circuit, but that would be difficult.
To answer your question, changing the capsule will alter the frequency response, sensitivity, polar pattern, and proximity effect. The degree to which these change, and the sort of change that results, depends entirely on the specific model and even the specific capsule.
David
January 6th, 2016 at 12:59 pm
Matt, do you have any opinion on headbasket mods on the v67g, such as inner mesh removal?
David
January 6th, 2016 at 1:03 pm
Matt, I should include with that last post that the headbasket mod would be in addition to v57 pcb upgrade and rk87 capsule swap
matthew mcglynn
August 10th, 2017 at 6:35 pm
@David, I no longer recommend DIY headbasket mods. I’ve found that removing the inner layers of mesh also removes their damping influence, which means the single remaining layer will resonate in the audio band. You can’t EQ that away from your tracks. Leave the grille alone, or replace it with one that was designed as a 2-layer mesh. Avoid single-layer mesh unless it is somehow damped to reduce resonance.
Jeff King
August 29th, 2017 at 7:10 am
I modded a V63M by replacing the diaphragm RK-87 and rebuilding the preamp (both with parts form Microphone Parts.com). I’m comfortable with soldering, etc. The build was pretty easy, as the instructions (with good photos) were excellent. The resulting microphone displayed (to my ears – not measurements) a better, clearer midrange response than my U87. It did not have the low end of the 87, but I ended up selling the U87. A mic that I had $250 invested in was more desirable than one I had $2200 in, since I feel that the midrange is where the money’s at…….