
Mounting acoustic panels with a variable air gap
Tuesday, December 13th, 2011 | by matthew mcglynn
 I have been progressively “deadening” my project studio. This article provides an easy solution to a recent challenge: mounting acoustic panels to the wall with a variable air gap behind each panel. A secondary goal is to minimally destroy the walls in the process.
Why would I want a variable air gap? I will answer that in two parts: why have any air gap, and why make it variable.
Why would we want an air gap at all? Why not mount the panels flush with the wall? The reason is that low-frequency absorption is improved when the panel is away from the wall.
RealTraps
When mounted on a wall with a spacer, sound gets behind [an acoustic panel] so its rear surface can also absorb. This air gap increases absorption as much as fifty percent, and also extends absorption to lower frequencies when compared with flat wall mounting. When placed straddling a corner the absorption is even greater, especially at low frequencies.
Ethan Winer of RealTraps gave me another data point: spacing a MicroTrap 3'' off the wall extends low-frequency absorption by one octave.
My next problem is that the wall in question is opposite a 9-foot sliding glass door — a perfect environment for standing waves.
“Standing waves” happen when a soundwave bounces back and forth between two parallel surfaces. The waveforms of the direct and reflected signals combine, causing peaks and dips that can vary by tens of decibels. In practice, the presence of standing waves means that moving a microphone a few inches creates an effective EQ boost or cut greater than can be corrected in the recorded track. This problem marred the results of the sax mic session of the $60,000 ribbon mic test, in which we later found up to 7dB difference at 400Hz, between two mics recorded simultaneously.
Therefore I was interested in mounting these panels at an angle to the opposite wall, in hopes of reducing the area of parallel surfaces in the room.
The importance of acoustic treatment
Before we go farther, I want to step back to cover the idea of acoustic treatment from a more basic perspective. If you’re new to home recording, and you’re recording acoustic instruments in a home office or bedroom, you should strongly consider investing in acoustic treatment. Untreated small rooms usually sound awful. Room reflections can kill a track.
Further, it is a myth that room reflections can be corrected by equalization. Check out Randy Coppinger’s notes from an AES session on low-frequency damping:
Randy Coppinger
Standing waves linger past the end of the original sound, a la reverb. My take away: Trying to control acoustical room response w/ EQ ignores the time delay (“after ring”) of the resonance. Treat acoustics not signal!
In other words, even if you know you have a dip or boost at a particular frequency, chances are the reflections causing that dip or boost are hurting your recorded tracks in other ways.
In short, small rooms are a problem. The smaller the room, the bigger the problem. As a gag, I once recorded some vocals in a toilet stall. No pun intended, but the results really did sound like crap.
Therefore my bias when recording in a small room is to treat it. The room need not be lined wall-to-wall in acoustic foam, although if it were, it would probably produce better sounds than an untreated drywalled bedroom with a hard floor. I think the ideal is somewhere in the middle, with lots of corner bass trapping and enough wall trapping to nuke flutter echo.
The Variable Air Gap mounting solution
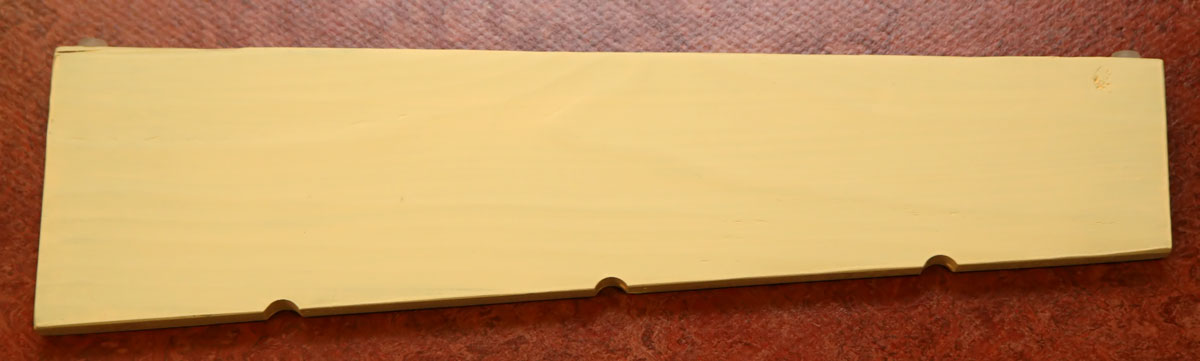 My idea for mounting rigid acoustic panels with a variable air gap is pretty low-tech: it’s a fat wooden shim. It acts as a spacing block that both holds the panel away from the wall, and creates a variable air gap. This particular design is perhaps unique to the panels I was using (RealTraps Microtraps), but the general principles should apply to any rigid acoustic panel.
First I made a cardboard form. It measured 18'' wide, with one long side cut at an angle so that the short sides measured 3'' and 5''.
Using the form as a guide, I cut three matching boards from scrap wood (9/16'' redwood), then notched the angled edge (with a Dremel tool) to accommodate the wire-hanging hardware on the back of the MicroTrap. I painted the blocks to match the wall, and mounted some self-adhesive silicone feet on the straight edge of each board to prevent scratches on the wall.
 The panels hang from heavy-duty picture hangers, rated at 10lbs capacity. (RealTraps’ MicroTraps weigh 8lbs.) This approach does no more damage to the wall than hanging a framed photo, thus being vastly superior to hanging foam panels with glue.
The standoff boards simply sit behind each MicroTrap. No special mounting is necessary; the boards are held in place by the weight of the acoustic panel. It would be easy to use Velcro to attach the spacer boards to the metal rail across the back of the MicroTraps, but there does not seem to be any value in doing so. In fact, the passive nature of this installation means it is trivial to remove these spacer blocks altogether. They can be inserted within seconds prior to a tracking session.
Audio tests
I hung the panels primarily for use during tracking, so the best test is a quick before-and-after recording. Before we get to the audio, I should mention that this room is already well-treated, so the “before” track is really not bad. You’ll hear a difference when the three new MicroTraps go up, but it’s more subtle than it would be if I was starting from bare walls.
First up is a loop: 4 bars without the new panels, 4 bars with the new panels, and a repeat. Listen to the space around the kick and snare; you can hear how it gets smaller when the panels are in place.
(Update: These audio tracks are mono overheads — one condenser hanging above the middle of the drum kit.)
Before and After loopTo be clear, I do not at all intend to suggest that having room sound in a drum track is a bad thing. But I’d prefer to have the room sound in a room mic, not in my overheads. Otherwise, it’s like printing reverb to every track.
The second test is even more revealing. There are two clips below, one with the panels and one without. I won’t label them, but if you can’t tell the difference, then — good news — you don’t need to spend any money on acoustic treatment! But I think you’ll hear how much tighter and cleaner the “with panels” clip is.
And again, remember that even the “before” clip has RealTraps MiniTraps at all the wall/ceiling junctions, most of the wall/wall junctions, and two of the upper tricorners, plus a 16-square-foot cloud of 4'' Auralex Studiofoam above the drum kit.
blind test: before or after? #1 of 2
blind test: before or after? #2 of 2
Related posts:


Posted in Acoustics | 10 Comments »
Bradford Swanson
December 15th, 2011 at 5:19 am
Great article and examples! Is this just an overhead we’re listening to? Panels in-place really brings the sound of the kit together – pretty remarkable difference!
matthew mcglynn
December 15th, 2011 at 8:30 am
Bradford, thanks for pointing out the oversight. Yes, the audio tracks are a mono overhead, hanging just above the center of the drum kit.
(I’m trying to get used to the idea of mono overheads, for part III of our recent feature on inexpensive condensers.)
Yoav
December 17th, 2011 at 9:48 pm
Hey, nice article.
Is there any way you can have a “show labeling” kind of thing so we know if we were right in the blind test? They do it with mic shootouts in other articles.
Thanks!
matthew mcglynn
December 17th, 2011 at 10:53 pm
Yoav, the “before” clip (meaning, no panels were hanging on the wall next to the kit) is the first of the two at the end of the article.
Yoav
December 19th, 2011 at 9:28 am
Huh, guess I was wrong. I thought the second one was the untreated because the snare was ringing more, I probably should have listened to the kick more in this context.
Thanks!
Jeff
December 26th, 2011 at 8:38 pm
We recently remodeled our practice/recording space and used some of the same ideas as are depicted in the article, but we used T-Pins to fix the acoustic foam to the spacers (easy enough to remove without doing damage) and where the foam is *on* the wall the pins invisibly hold the foam in place without glue.
Our drum area is foamed in with 6-1/4″ plexi panels separating the drums from the rest of the studio. Up above the drums is a deflector we designed to bounce the cymbals/hats across the ceiling where it’s dispersed evenly – the ceiling pitches down 15deg over the drums and it really, really works. One unintended benefit was that the drummer can hear everyone else better (previously had to use IEMs.)
Michael
January 10th, 2012 at 7:08 am
I agree, the second sample fooled me a bit because of the ringing snare. Overall, the drum kit was much tighter in the second sample, especially in the mid to low end, but I was torn over the ringing. What changed with the snare between samples? Did some other resonant frequency pop up causing the snare to ring more, or was it simply a matter of something got moved and the snare wasn’t damped anymore?
matthew mcglynn
January 10th, 2012 at 9:04 am
This snare drum has a very small sweet spot. I must have hit it slightly off-center in the second clip. Still, even if the snare itself is misleading, the overall sound of the kit is significantly different in the two clip — there is way more room sound in the first clip.
Jeff Kyle
November 15th, 2016 at 1:57 pm
About how far down did you attach the hanging wire to the back of your panels? It looks to be about half way down as far as I can tell. I’ve built panels that have 4″ spacers in the corners and was looking for the best way to hang them. Your method looks like it will work for me. I’d just like to know if the midway point on the back of the trap sounds right or if you think it should be higher up. Thanks!
Adam Johnson
July 24th, 2019 at 7:21 pm
Love this article, very informative. Hi-hat was the dead giveaway for me in the blind test. Cleans up substantially in #2