
How to test drum bearing edges
Saturday, August 22nd, 2009 | by matthew mcglynn
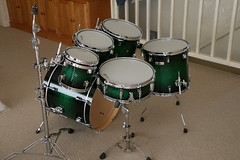 Some people emailed to ask what happened to my new Taye drum kit. I posted pictures of the unboxing in March, but haven’t mentioned the kit since then. It was conspicuously absent from the photo at the end my recent USB audio interface/mic-pre shootout.
The story of my Taye StudioMaples is a sad one, because the drums were defective.
I first learned about Taye at NAMM last January. They drums looked great. They sounded great. And they cost about half what a comparable Tama kit (for example) would cost.
 The StudioMaple line has just about the thinnest shells on the market, which is exactly what I wanted.
I did my research first — I read everything I could find about them. I visited a dealer. Everybody loved the drums. I couldn’t find a negative word about them.
My secret fear was that the bearing edges would be bad. Why would I worry about that? Because I can see the future, apparently. I actually asked the dealer about it — “What should I do if the bearing edges are bad?”
“That’s a deal-breaker,” he said. “We’ll send them back.”
Reassured, I put in the order. I got a 6-piece shell pack (kick, snare, four toms, rim mounts, no stands) for about $1675, shipped. And I was really impressed with it, as I said in the unboxing. The finish was gorgeous. The drums were clean.
But they wouldn’t tune worth a damn.
At first I thought it was due to the “Dynaton” crimp-lock heads that come stock on the kit. A couple drum technicians suggested to me that crimped heads don’t hold tension as well as heads whose edges are epoxied into the collar; I hoped the problem was that the head material had pulled out of the collar on some of the stock heads. So, I ordered a stack of Aquarian heads… but they had the same problem as the Dynatons.
The specific symptom that I experienced on nearly every shell was that I couldn’t get equal tension at adjacent lugs. In some cases, I could remove two of three lugs, leaving one in the middle, and still the area of the head above the missing lugs would be higher-pitched than area above the lug in the center. The only possible explanation for that was that the bearing edge had high and low spots.
Not every drum was affected. The snare drum sounded great. The kick drum did too. But every one of the toms had at least one warped edge.
 I initially rejected that conclusion out of hand. The drums were new, fresh from the warehouse. Surely a new drum kit wouldn’t ship with wavy edges?
Testing the edges seemed impossible, because I don’t have a truly flat surface to compare the shells to. Someone suggested buying a piece of plate glass and painting it black, but that seemed like a hassle. On the other hand, paying a drum builder to recut all the edges on my brand-new drum kit would have been a bigger hassle.
Ultimately, I tested the edges on a Formica countertop. It is not as flat as the laser-polished slab of marble that DW uses, but as it turns out it was good enough for my purposes. Meaning, the shells were in bad enough shape that even on a Formica countertop, the problem was easily seen.
Before I go on, I want to make clear that I do not intend this article to be a condemnation of Taye Drums. My experience with this one kit was not good, but I believe this was an anomaly. There is no way they could have been shipping defective drums for the past 30 years without a single other player mentioning a problem with the shells — especially not now that they’re putting their own name on the label. My kit happened to slip through their quality control procedures, and I’m sure the company has taken steps to address whatever loophole allowed this to happen. Therefore the chances of anyone else getting out-of-true bearing edges from Taye are even smaller now than they were six months ago.
How to test bearing edges
The best way is to use a really flat surface. They’re hard to come by; kitchen counters don’t usually get built to micrometer tolerances.
Granite, marble, and glass might be naturally superior to composite materials, but the truth is you’re probably going to use your kitchen counter or a coffee table anyway, whatever it’s made of. So I’ll tell you how to make the best use of whatever you have.
 The general approach is to put the drum, with no heads, on a flat surface, then drop a flashlight or, preferably, a small (low-wattage) bare light bulb inside the shell. Kill the room lights, and look for light escaping from the bottom edge of the drum shell, where it meets the counter.
The problem is that if you put something that may not be perfectly flat, like a drum shell’s bearing edge, on a surface that also may not be perfectly flat, like a countertop, you will likely see a light gap where the two surfaces don’t exactly meet — but you won’t know which one is to blame. Is the gap due to a low spot on the counter, or a low spot in the shell?
The solution is to spin the shell in place on the counter. Any inconsistencies in the countertop are then going to show up as a consistent light gap as the shell turns. If the shape of the light gap changes as the shell turns, then it is very likely that the shell has high and low spots.
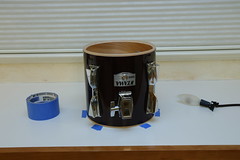
To prevent the drum shell from sliding around on the counter while you spin it, mark its position with 3-4 pieces of tape on the counter around the circumference of the shell. When you spin the drum, make sure it stays inside the perimeter described by the pieces of tape.
Put a camera on a tripod in front of the counter. The tripod ensures that the camera’s position relative to the drum shell is consistent — important because a change of angle could make the light gap appear to change. Take a photo of the light gap, then spin the drum 1/4 of the way around, and take another picture. Repeat twice more, so you’ve photographed the entire 360° of the shell.
 If you don’t see any light at all, you have a perfect bearing edge and a perfectly flat counter top. But it’s more likely you’ll see some light escape. The true test is watching the change in the light gap as the drum spins around — you can do this by comparing the pictures. See the animated image at right; it shows two photos of a drum with a bad edge. You can see that the position of the drum on the counter is consistent, but the light gap changes considerably. This is basically a picture of the high and low spots on the bearing edge.
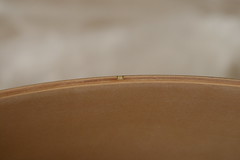
 On two of the edges on my Taye kit, the gaps were big enough that I could slide a piece of paper underneath, like the 8'' pictured at right. My poor drums!
In the end, the folks at Taye were gracious about my warranty claim, despite initially believing than I was a nutjob. I can’t say I blame them; at first I thought I was going crazy too. But after inspection (of the drums, I mean), they confirmed that the shells were indeed defective. I’m sure they had some followup conversations about their QA program, because they can’t afford to be selling defective instruments at that price point.
They offered to send me a replacement kit. It was a hard decision, but after consideration I declined. I am quite sure that the replacement kit would have been perfect in every respect, but I’d by then grown attached to a particular kit from a different manufacturer (which I look forward to reviewing here, if and when the damn thing ever ships). [Update: It’s here!]
The takeaway lesson is that if you have a drum that is consistently difficult to tune, it may well have a bad bearing edge. Another takeaway lesson: you can test this yourself, without special equipment.
On a new drum, a bad bearing edge makes for a valid warranty claim, in my opinion. If your new kit, with new heads, can’t be tuned, you should test the shells. If they’re not flat, send them back, because you’ll never be happy with drums that don’t tune up.
On old drums, you can get bearing edges recut and sealed, usually for about $20 per edge. This can completely restore a crappy-sounding, ringy, off-pitch tom or snare. Find local drum builders through your music store.
Update: Technically speaking, the problem with these Taye drums was not that the bearing edges, meaning the shape of the beveled cuts in the edges, were bad. It would be more accurate to say that the drums were not square or that the faces were not true — essentially, good bevels had been cut into a shell whose edge was not flat; therefore the result would never sit flush with a drumhead (or countertop). This distinction may only be useful to drum builders, but in the interests of being accurate I am happy to make this clarification here. I suspect most drum builders can fix both problems.
Related posts:

Tags: bearing edges, Drums, taye
Posted in Drums | 17 Comments »
Aaron Lyon
August 22nd, 2009 at 12:33 pm
Wow. Nice article. Happy to hear your head (cranium) gasket is still sealed.
seablue
September 3rd, 2009 at 12:44 pm
perfectly well explained 🙂
and helped a lot !
Paul Hollis
October 5th, 2009 at 7:53 pm
very informative, thanks for all the info
i have some toms i need to test!
i think i know you… i used to play with Jim suhler…
Paul Hollis Dallas TX
James
December 17th, 2009 at 9:50 am
Wow. Great article. Too bad about your Taye’s. I have two kits of theirs and they are great kits, like my old Ayottes.
ben
January 30th, 2010 at 2:56 am
just stumbled across this site googling a microphone. there is more information here than I can deal with. Just read your interview with the guy who did Moving PIctures. My girlfriend totally hates you.
Tim
February 20th, 2010 at 6:17 pm
Ouch… I’d only heard good things about Taye before. Hopefully this is only an aberrance for them.
The Japanese makers (Tama, Yamaha etc) are fanatical about quality control. You pay more for the product, but you know it’s going to be top notch!
How To Check Your Bearing Edges « The Caffeinated Drummer
February 20th, 2010 at 8:11 pm
[…] Matthew McGlynn from Recording Hacks had this problem with a kit he recently bought. He wrote an article about what happened and how he was able to check the edges. […]
Bruce Brooker
March 31st, 2010 at 4:21 am
Great article on the nightmares of bad bearing edges.
I am happy to say that my 1960 Ludwigs are perfect in that regard, they sound just as good today as when they came off the line all those years ago.
They tune like a dream.
I do feel sorry for the owners of entry level kits with all the flashy finishes that sound like dogstuff because of badly engineered bearing edges.
Ian
May 20th, 2010 at 12:07 am
I know exactly where you are coming from Thomas…..I have the exact same prob with my new MAPEX kit. fitted with pin stripes. Currenty exploring getting the bearing edges RE -DONE.
Joey A
July 17th, 2010 at 7:44 pm
I’ve seen the Taye drum sets at the NAMM show for the past few years and from a distance they look really nice, but upon closer inspection I noticed that the hardware was cheap and flimsy. As far as bearing edges go, many “bargain” drumsets suffer from this very ailment. I am very picky when it comes to this issue. When I replace my drumheads, I even use paraffin wax so the heads pull evenly. My suggestion is to return the Taye drums and get a higher quality brand. You deserve it!
Travis Whitmore
July 5th, 2011 at 10:56 am
Great post, Matt. Interesting stuff about the Taye kit, sorry to hear. What a pain.
John Matuszek
June 27th, 2012 at 10:46 am
They KEY point to this article then… Taye does make good drums look at the other comments, they had a slip up on this set for whatever reason, and in the end they took them back when the replacement wasn’t accepted. ANY drum company can and will eventually have one slip through that could have issues on the bearing edge – it is manufacturing and that means there can be QA issues to catch dependent on the run. So long as the company stands behind their product when there are issues, then I see no negative here at all regarding Taye. In fact from my research the StudioMaple IS the best maple kit on the market at a reasonable pricepoint, they sound awesome, and I’m in the process of ordiering soon. Thanks this will keep me alert to check, but in no way does it change my mind about Taye and their product.
John Matuszek
June 27th, 2012 at 11:12 am
Now here is the problem I have with this supposed “science”. What other “control” tests have you done with other drum manufacturers to see what the deviation is on their bearing edges? You seem to make it sound like the width of a piece of paper makes it impossible to tune a kit. Let me tell you I just refurbished a 1966-68 Ludwig set with clean-up and new heads. They were some SERIOUSLY abused bearing edges, yet I did NOTHING in repairs on them – not my kit just giving it a fresher start the heads were old and a mess. Anyway I was able to tune them JUST FINE, and I guarantee if I put them on the countertop and ran this test, we could put a ream of paper under some of the edges. Sorry but I may have to agree with Taye’s original assessment here – rims and heads are also just as important and if you have problems with them this can also cause issues. I plan to check my old Pearl BLX with this test to see if it shows the same, and I have no tuning issues there after 20 years of use.
Henrik Rathje
June 30th, 2013 at 9:02 am
Hi,
Have to agree with mr. Matuszek here.
I build and restore drums.. And yes, edges have to be true to a reasonable degree.. But just because a piece of normal paper kan slide in.. No.. Sorry.. That will not be the reason for an untunable drum.
Did you check if it was round?.. Out of round shells can behave like that.
I also own vintage and newer drums that are not perfectly true and they tune with ease..
Please note that I do NOT say that your Taye were tunable, just that being 1000% true is not required for a drum to tune correctly.. Just think about a snare bed on a snare drum.. Thats way out of true and you can easily tune the head to be in tune 🙂
Also not saying that Edges should NOT be true.. They should.. But a deviation of up to 0.5 mm (0.02″) will be ok.. If they ARE 100% true thats nice!,, but they will tune with no problem even with a 0.2-0.5mm level difference.
At least thats my experience during my work with drums 🙂
Regards
– Henrik
Robert Beck
January 4th, 2014 at 2:24 pm
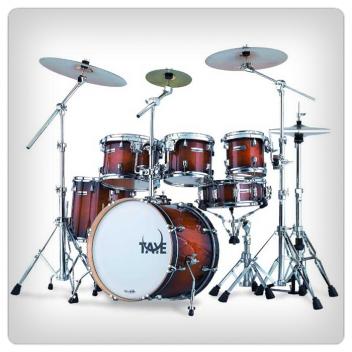
Thats unfortunate.I am playing a set of studio maples exactly like the
tobacco burst kit shown .They sound exellent.For the money you cant beat
them.Thanks for the interesting read.
Rob
Charlie
March 7th, 2014 at 8:29 am
The problem that I am experiencing is not tuning, its getting the toms to stay there. An imperfect bearing edge can cause the drums to de-tune and that’s what is happening here. They tune fine (and sound great) but after a week or so of playing, the notes go lower and lower. Should not have to tune a $2300 drum set every week.
Henrik Rathje
October 18th, 2015 at 3:05 am
Hi again
Well detuning.. Personally any problem I have had was due to inaccurate Lug inserts (threads). Which can cause the screws to become loose because the screws do not fit tightly enough.. Also warped hoops can cause that.. And off course: playing with plenty of rimshots 🙂